How to Sissy Squat: Progressions, Tips, Variations
Learn how to sissy squat with exercise progressions and practical tips. Plus, 5 weighted sissy squat variations you can train with.

Curious about the sissy squat because you heard it’s an insane quad builder? Or that it gives the quads an unmatched stretch? Or maybe you’re just bored?
TBH, we tried the sissy squat simply because it looked badass. So, here’s how you can do it too.
(Psst: the sissy squat is a nice party trick, especially if your friends are no longer young and nimble.)
What’s sissy squat?
The sissy squat is a quad exercise that lets you bend your knees as much as possible without having to bend your hips, helping you target your quads better.
Hip flexion: Bending of the hips
How’s that unique? Most leg exercises involve both bending of the knees and hips at the same time. The sissy squat is one of the rare few that don’t.
Benefits of sissy squat
Great for training quads
The sissy squat puts the knees through a massive range of motion (ROM) that’s difficult to replicate with other exercises.
This ROM maximizes the amount of knee extension your quads have to do in order to stand back up.
As such, your quads get worked really hard in the sissy squat.
Targets rectus femoris
Exercises with squat-like movement can’t train the rectus femoris (1 of the 4 quad muscles) effectively.
For that, you need an exercise that keeps your hips in a fixed position throughout.
The most popular option? Leg extension.
Another great option? Sissy squat.
Not only that. Due to the lack of hip flexion, it's possible that the sissy squat could be even more effective than the leg extension at targeting the rectus femoris.
Wondering why leg extensions (and sissy squats) target rectus femoris while squats don’t?
Improves control and balance
The sissy squat has a steep learning curve for good reasons.
You need to have:
- Strength: To control the downward and upward movement
- Balance: To keep all your weight over the balls of your feet
- Mobility: For your knees and ankles to move well
- Flexibility: For quads to enter deep stretch
Sounds like a lot? It is.
That’s why we’ll be showing you how to sissy squat and how to train for it in stages using exercise progressions.
How to sissy squat
Let’s first run through how to do the unsupported, bodyweight sissy squat.
New to the exercise? The goal should be to eventually do 3 to 5 reps of the unsupported sissy squat with good form. This gives you a good base to work with other sissy squat variations.
Sissy squat setup
The setup is straightforward:
- Safety: Ensure you have enough clearance around you
- Stable footing: Make sure the flooring is firm enough
- Arms up: Keep your arms up in front of you* (to help with balance)
- Stance: Stand with feet about shoulder-width apart
- No hip flexion: Don’t bend your hips throughout
*Tip for arm position: you can also place your arms by your side (or hands on your hips). This is more challenging for balance though, so try it only when you’re familiar with the movement.
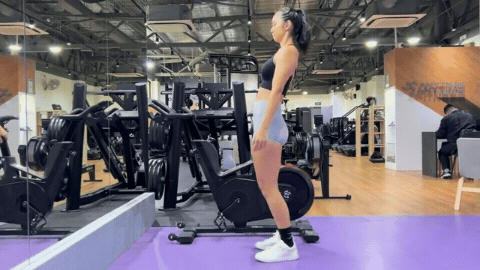
How to do the sissy squat
Step-by-step instructions:
- Brace your core. Keep your arms up in front of you.
- Start by driving your knees forward and downward (~45 degrees). At the same time, lean back just enough to stay balanced and maintain your hip angle. Your weight will gradually shift toward the balls of your feet.
- At the bottom position, reverse the movement slowly to return to the upright position.
That’s 1 rep!
Important cues
Take note of the following cues for sissy squats:
- Keep it slow: Maintain a slow and constant tempo when going up and down
- Reverse the movement slowly: Balancing at the bottom is the trickiest, so avoid any forceful and sudden changes in speed there
- Lead with your knees: Start the movement with your knees moving forward, letting your body find the balance it needs
- Brace your core: Maintain a strong core for stability
Supported vs unsupported sissy squat
There are 2 ways to approach the sissy squat: supported and unsupported.
With supported sissy squats, you get to assist yourself with 1 hand (more on that later). It helps you worry less about losing balance.
While both are great options, go with the supported sissy squat if your goal is hypertrophy.
It’s hands down the better option to include in training programs.
Why is the supported sissy squat better for hypertrophy?:
- You can use more weight without being limited by balance.
- You can train much closer to failure without worry.
- You can better focus on the movement and stretching.
- You can perform sissy squats more safely.
- You can be more confident in executing the exercise.
Of course, you should aim to comfortably manage at least 3 to 5 reps of unsupported sissy squats. That’s one way of telling if your fundamentals are strong enough.
(You need to aim to do more if you’re using it as a party trick! 🥳)
Common mistakes
These mistakes apply to all types of sissy squats — weighted or bodyweight, supported or unsupported.
Leaning back before you move your knees
Initiating the movement by leaning back throws off your balance during the sissy squat.
Plus, you’re more likely to end up bending backward at your hips.
How to fix? Start every rep by driving your knees forward. Let this forward pull initiate your backward lean.
Leaning back too much
During the sissy squat, the backward lean is a counterbalance to the forward movement of your knees.
With too much of a backward lean, you’ll limit how far your knees can move forward — and most probably, find yourself falling on your butt.
How to fix? Don’t overthink the lean. Focus on moving your knees forward and maintaining your hip angle. Let your body find the right balance.
Going too fast
You cannot rush through a sissy squat or “explode” out of the bottom position like with other types of squats.
Balance is key in the sissy squat. As tempting as it might be, sudden changes in speed or force are going to throw you off (literally).
That’s why every rep has to be slow and controlled.
How to fix? Slow down every stage of the exercise. Be very intentional about coming out from the bottom position slowly to avoid a shift in balance.
Using too much weight
Progressed from bodyweight to weighted sissy squats? Great, but don’t pile on weight too quickly.
The sissy squat isn’t quite as easy to overload as other squat movements. It’s a very demanding exercise.
Give your quads time to build the strength, balance, and mobility it needs to perform the sissy squat with added weight.
How to fix? Take more time at each weight and progress with smaller jumps in weight.
Relying too much on support
Supported sissy squats are great if you’re going close to failure or adding weight.
But don’t get overly reliant on support to complete each rep. The support should be as minimal as possible.
You shouldn’t be:
- Pulling yourself up every rep
- Clinging on to support for dear life
- Crashing to the ground if you released
How to fix? Maintain a reasonable grip on your support and pull gently only when you need to rebalance. Approach every rep as if it’s an unsupported sissy squat.
Safety tips
Have enough room to fail safely
Make sure you have plenty of space in front of and behind you during the sissy squat.
When you fail, you typically fall forward or backward. The last thing you want is to be launched into someone or something while squatting. 😵
Have a reasonably soft landing
Here’s what typically happens when you fail on the sissy squat:
- Fail on the way down: Land on your knees or fly forward
- Fail on the way up: Land on your butt (torso should move into upright position instinctively)
If you’re still new to the movement, be prepared to fail at any stage of the sissy squat. Set up exercise mats to cushion your fall if needed.
That said, as long as you’re going slow enough, you’ll get away with a soft landing with your knees.
In comparison, landing on your butt tends to hurt more, so be prepared for that.
Use safety bars or stoppers
Graduated to doing weighted variations of the sissy squat? Awesome.
Just remember: prioritize safety!
Start by taking care of your setup:
- For supported sissy squats: Make sure your support is easy to grab and holds your weight
- For unsupported sissy squats: Use safety bars (on squat racks) or stoppers (on Smith machines)
Sissy squat progressions
Doing a sissy squat right away isn’t an easy feat.
Fortunately, you have exercise progressions to help you build toward a sissy squat in stages.
We'll start with the easiest exercise on this list.
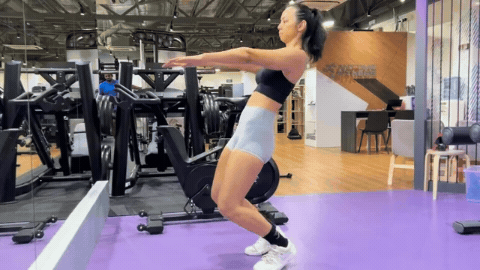
Goblet squat (heel-elevated)
To even start doing a sissy squat, you first need the strength and mobility to drive your knees forward.
The heel-elevated goblet squat is perfect for that. It emphasizes the forward movement of the knees while keeping your hips at an angle that’s easy to balance.
Here’s the heel-elevated goblet squat:
In a crude sense, the heel-elevated goblet squat is a sissy squat without the backward lean (and with heel support).
Why elevate the heels? This allows your knees to travel forward more, just like it would in a sissy squat. It also helps if you’re working with limited ankle mobility. The higher the elevation, the more your knees can move forward.
While it’s nowhere close to replicating the stretch on the quads in a sissy squat, the heel-elevated goblet squat is a good and familiar starting point for most.
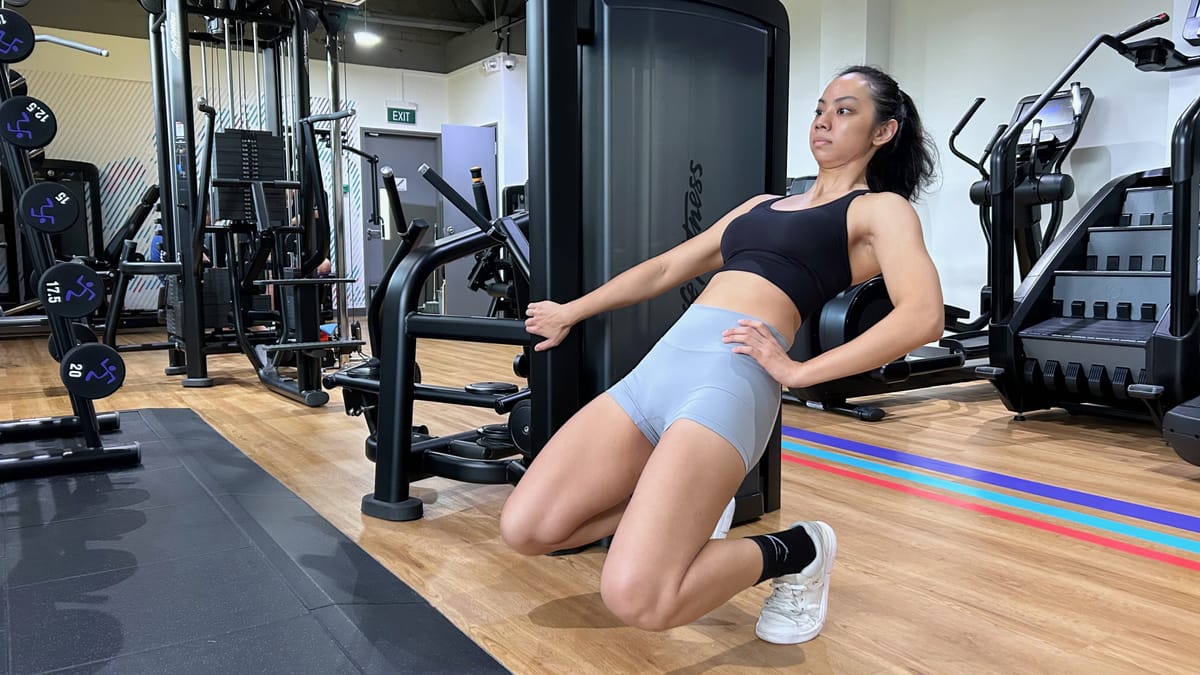
Reverse Nordic curl
After the goblet squat, the reverse Nordic curl is a natural next step. It closely replicates the sissy squat’s movement pattern with no
Key difference? The reverse Nordic curl provides a more stable setup than the sissy squat since your knees are supported.
Here’s how to do the reverse Nordic curl:
With the reverse Nordic curl, start with the band-assisted version and move on to body weight when you can.
From there, increase your ROM over time. This helps you develop the strength and mobility needed to control the movement.
You can expect to feel an intense stretch in your quads with the reverse Nordic curl, similar to that in the sissy squat.
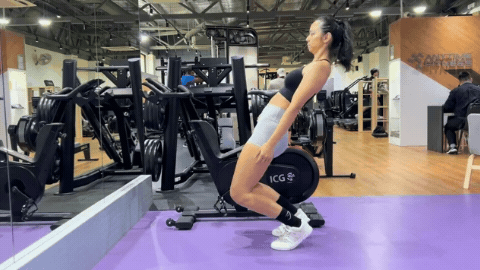
Supported bodyweight sissy squat
This is pretty much the real deal. Just with a little support to help build your confidence and balance.
Your point of support should be in front of you and at about waist height.
Here’s the supported bodyweight sissy squat:

The bodyweight sissy squat is where you put everything you’ve practiced together.
Feeling a little shaky? Try elevating your heels (with a weight plate or squat wedge) to get comfortable with the movement. The heel support makes it a lot more stable, albeit limiting your ROM quite a bit.
Once you’re more confident, remove the heel support and increase your ROM gradually.
With supported sissy squats, remember to keep the assistance minimal. Support just enough to keep yourself balanced.
Your goal here is to:
- Work on your technique and form
- Improve ROM
- Increase reps
Sissy squat variations
Ready to move on from bodyweight sissy squats?
There are plenty of ways you can increase resistance on the sissy squat.
(👀 Yes, we’re watching you — be sure to progress).
Weighted sissy squat
You can use dumbbells, weight plates, or kettlebells for the weighted sissy squat.
Here’s the weighted sissy squat (with weight plate):
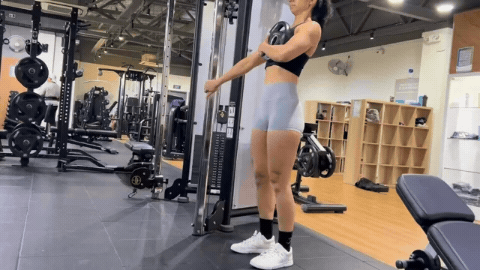
With weights that are harder to hold across your chest, you can hold them right by your hips as well. This is particularly useful for dumbbells.
Heads up: this shift in position changes your balance slightly, so be sure to ease into it.
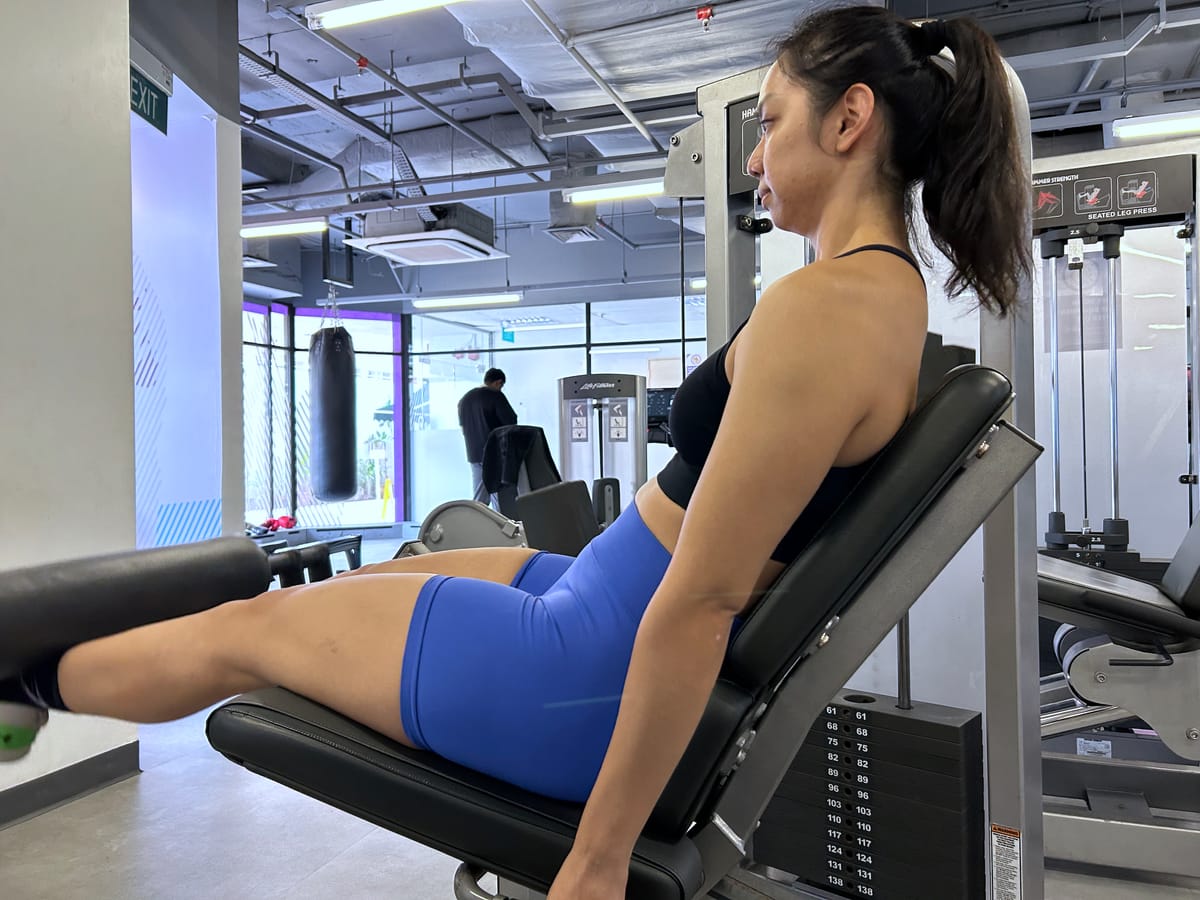
Sissy squat (hack squat machine)
Looking for a safe and stable setup for the sissy squat? Try the hack squat machine.
How to do the sissy squat (hack squat machine):
The hack squat machine sissy squat locks in the path you can move in and keeps the load firmly on your shoulders.
This is helpful in a few ways:
- You don’t have to worry about balancing
- You can focus more on your technique and overloading
- You don’t need to hold on to a weight
Note: since the hack squat machine is designed at a 45-degree angle, it’d feel like you’re leaning backward even further than on regular sissy squats.
Smith machine sissy squat
Despite what you often hear, the Smith machine is a safe and wonderful choice of equipment in the gym.
The Smith machine sissy squat is a great example.
Here’s an awesome Smith machine sissy squat:
@charles_moresi Replying to @caiobbb #sissysquat #smithmachinesquat #trainingtofailure #sissysquatworkout #greenscreenvideo ♬ Patiently Waiting (Instrumental) - The Instrumentals
Just like the hack squat machine, the Smith machine locks in your path for greater stability. This helps if you want to worry less about balance and more about overloading.
If you’re nitpicking, the Smith machine sissy squat feels slightly less supportive since the weight doesn’t sit as nicely on your upper back.
And remember to set your safety stoppers!
Psst, the Smith machine has a lot more potential than you think:

Landmine sissy squat
The landmine sissy squat is another great option for loading.
What’s unique? The landmine sissy squat lets you stay more upright at the bottom position than with other variations.
That said, it doesn’t provide much additional support like the Smith machine or hack squat machine can.
Here’s how to do the landmine sissy squat:
Pointers for setup:
- Face the landmine attachment
- Start with a forward lean into the bar
- Stand on weight plates if needed (so you can use your full ROM)
Cable sissy squat
Of all the machine variations, the cable sissy squat is arguably the fastest to set up.
Wonderful demo of the cable sissy squat:
That said, the cable sissy squat has some drawbacks:
- Weight pulls you forward: This can throw you off balance, limiting your weight and ROM.
- Need to elevate heels: The forward pull makes it hard to balance on the balls of your feet and this helps to provide some stability.
- Need enough height on elevation: You need to elevate your heels high enough to enjoy your full ROM.
For hypertrophy, the difficulty in balancing and limited ROM could be a dealbreaker.
Of course, as with most exercises, try it and decide for yourself!
Sissy squat misconceptions
The sissy squat is very misunderstood. So, let’s get these misconceptions out of the way and off your mind.
Sissy squat is bad for your knees
This myth likely comes from research from the 1970s and 1980s that suggested that knees moving past your toes during a squat increase your risk of injury.
Given how far forward the knees move in a sissy squat, it’s no wonder this exercise (unjustly) fell off the radar.
Fortunately, research in the years that followed has shown that allowing your knees to move forward naturally is safe and even necessary.
Sissy squat is limited to body weight
While often seen as a pure bodyweight exercise because of how hard it is, the sissy squat can absolutely be done with added resistance!
Just recognize that the learning curve is a little steeper, and you’re going to have to start small.
Also, moderate your expectations — the sissy squat doesn’t progress as quickly as other exercises.
This means sticking around longer, practicing the movement frequently, and being very patient. You’ll break out from bodyweight eventually.
It's hard to progressive overload on the sissy squat
Yet another myth we believe is simply due to how rarely sissy squats are done.
Just think about it: have you seen anyone in your gym doing weighted sissy squats?
Of course, as you’ve already seen, there are plenty of ways you can load the sissy squat!
Most people start with weight plates before moving on to dumbbells and machines. All the sissy squat variations we’ve shared allow for small increments in weight as well.
How to add sissy squat to your training
To add it to your training program, find a sissy squat variation that you enjoy and can overload with over time.
Sissy squats are perfect if you need to “isolate” your quads to balance out your better-trained glutes and hamstrings. (😉 Yes, we know it’s always glutes first.)
3 sets weekly is a good starting point.
When programming, treat the sissy squat as a “specialized” quad exercise. Minimize overlap (especially in the same workout) with other exercises that emphasize knee extension (like leg extensions).
It’s also good to keep the sissy squat in the earlier parts of your workout while you’re still fresh.
FAQs on sissy squat
How can I do the sissy squat safely?
As with any exercise, start gradually and slowly. Go through the exercise progressions to build up your strength in stages.
During your sissy squat setup, always ensure you’ve enough space to fail safely.
Avoid rushing into using weight for the sissy squat. It’s challenging enough with just body weight when you’re new to the movement.
Should I use support on the sissy squat?
When you’re just starting out, build toward being able to do the unsupported sissy squat. This ensures that you’ve developed a strong technique.
Aiming to train with sissy squats for hypertrophy? Use supported sissy squats or machine-based variations.
These options are safer, easier to load, and prevent balance from being the limiting factor.
For unsupported sissy squats, limit them to body weight (or just load very sparingly).
Can I just do supported sissy squats from the start?
Of course! That’s up to you.
We suggest mastering unsupported sissy squat first because:
- It helps you develop a stronger technique
- It teaches you to control the whole movement well
- It leaves you with better habits (e.g., not relying too much on support, getting the right amount of lean)
We know this takes a longer time and not everyone wants to spend weeks working on a new exercise.
So, if you enjoy supported sissy squats and they work for you, go for it! 😎
Should I elevate my heels during the sissy squat?
You can! But while it helps with stability, it might not be a practical setup since it could limit your ROM.
How it works: the greater your ROM, the higher the elevation needed to make sure your heels stay supported.
In practice, finding an elevation that’s high and stable enough is tricky.
A quality squat wedge (at least 20 to 30 degrees) might help, but this isn’t readily available in most gyms.
This is even worse if you have a great ROM (knees almost touching the floor) on the sissy squat.
A simpler alternative? Do the supported sissy squat instead. Your hands are a more versatile form of support than elevated heels.
Can I substitute the sissy squat with leg extension?
The leg extension and sissy squat are both great for training quads.
The rectus femoris, in particular, benefits from these 2 exercises since squat-like exercises can’t target it effectively.
One key difference though: leg extensions are done in a seated position with hips at a 90-degree angle, while sissy squats are done with no hip flexion.
It has been suggested that the smaller the amount of hip flexion, the more effectively you can target the rectus femoris.
For that reason, some have recommended doing the leg extension with a backward lean in order to decrease the amount of hip flexion.
This could be a good modification if you’re trying to use the leg extension as a sissy squat alternative.
Can I use the sissy squat machine instead?
Despite the similarity in name, the machine sissy squat doesn’t quite replicate the sissy squat exercise we’ve been talking about.
Key differences:
- Amount of hip flexion: Greater in the machine sissy squat
- Amount of knee extension: Smaller in the machine sissy squat
The sissy squat machine simply isn’t set up to replicate the sissy squat movement effectively.
While the sissy squat machine is still a wonderful option for training quads, it wouldn’t be a good substitute for the “real” sissy squat.
Do my knees need to touch the floor during the sissy squat?
There aren’t any clear good or bad points here. Do what feels right to you.
From our experience, coming off from a dead stop (knees touching the floor) and keeping your hips in position at the same time can be quite tricky.
It might be easier to stay balanced if you stop just short of touching the floor.
If you have a fantastic ROM on the sissy squat, try standing on weight plates or a step board.
Why is it called “sissy squat”?
There’s no real way to fact-check how the “sissy squat” name came about, but here are 2 popular origin stories:
- Named after Sisyphus: a mythical king made to push a boulder up a hill for eternity
- Coined by Vince Gironda: the famous 1950s bodybuilder is believed to have said, “The sissy squat will make a sissy out of you!”. He credits Monty Wolford for inventing the sissy squat.